Vue.jsを使って今日のお天気を表示する
Switch Staff
- #vue.js
- CODING

こんにちは!スイッチの高橋です。
今回はVue.jsとOpenWeatherMap APIを使用して、特定の場所の天気状況を取得し、表示する方法を紹介します。
プロジェクトのセットアップ
APIキーの取得
OpenWeatherMap APIを使うには登録をしてください。
下記URLから登録することができます。
https://openweathermap.org/
Vue.jsとaxiosの追加
HTMLファイルにVue.jsとaxiosを追加します。
以下のコードを<head>セクションに追加します。
<head>
  <!-- 必要なら追加 Tailwind CSS -->
  <script src="https://cdn.tailwindcss.com"></script>

  <!-- Vue.js -->
  <script src="https://unpkg.com/vue@3.4/dist/vue.global.js"></script>

  <!-- axios -->
  <script src="https://unpkg.com/axios/dist/axios.min.js"></script>

  <!-- 作成したJavaScriptファイル -->
  <script type="text/javascript" src="./main.js" defer></script>
</head>
HTMLファイルの作成
ページに表示するコンテンツを定義したHTMLファイルを作成します。
<body>
  <div id="app">
    <!-- ここにお天気情報を表示する要素を追加 -->
  </div>
</body>
Vue.jsアプリの作成
JavaScriptファイル(main.js)の作成
Vue.jsアプリのロジックを記述します。Vue.jsのcreateApp関数を使用してアプリを作成し、OpenWeatherMap APIからデータを取得します。
const { createApp, ref, onMounted } = Vue;

const app = createApp({
  setup() {
    const item = ref('');
    const weather = ref('');
    const temp = ref('');

    onMounted(() => {
      axios
        .get('https://api.openweathermap.org/data/2.5/weather?q=Okayama,JP&lang=ja&units=metric&appid=APIキー')
        .then((response) => {
          item.value = response.data;
          weather.value = response.data.weather[0];
          temp.value = Math.round(response.data.main.feels_like);
        })
        .catch((error) => console.log(error));
    });

    return {
      weather,
      temp,
      item,
    };
  }
});

app.mount('#app');注意:”APIキー“を自分のOpenWeatherMap APIキーに置き換えてください。
お天気情報の表示
“#app“内にお天気情報を表示する要素を追加します。
    <div id="app">
      <div class="flex items-center">
        <img :src="'https://openweathermap.org/img/wn/' + weather.icon + '@2x.png'" >
        <div>
          <p>今日の<span class="font-medium text-lg">{{ item.name }}</span>の天気は<span class="font-medium text-lg">{{ weather.description }}</span>です。</p>
          <p class="font-medium text-xl">{{ item.name }} {{ temp }}°C</p>
        </div>
      </div>
    </div>
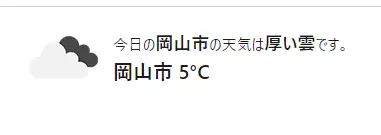
これで、簡単なVue.jsアプリが完成しました。HTMLファイルをブラウザで開いて、お天気情報が表示されることを確認してください。
下記みたいに表示できたら完成です!
▼表示画面

それではまた!


